How to Design a Warehouse Layout: Zones, Flow, and What to Avoid
A warehouse layout organizes space into functional zones — receiving, storage, picking, packing, staging, and shipping — and routes goods through them with as little backtracking as possible. Good layout decisions cut pick travel time, which is often the single largest chunk of labor in the building.
A picker in a busy warehouse can walk several miles in a single shift. A large share of that walking, by many estimates close to half of total pick time, is pure travel, not picking. It produces nothing. Your layout decides how much of it your team does every day, which makes layout one of the cheapest levers you can pull before spending a dollar on software or labor.
Good layout isn't about a prettier floor plan. It's about routing goods through the building with as little backtracking as possible, and putting the things you touch most within easy reach. Here's how to think about it.
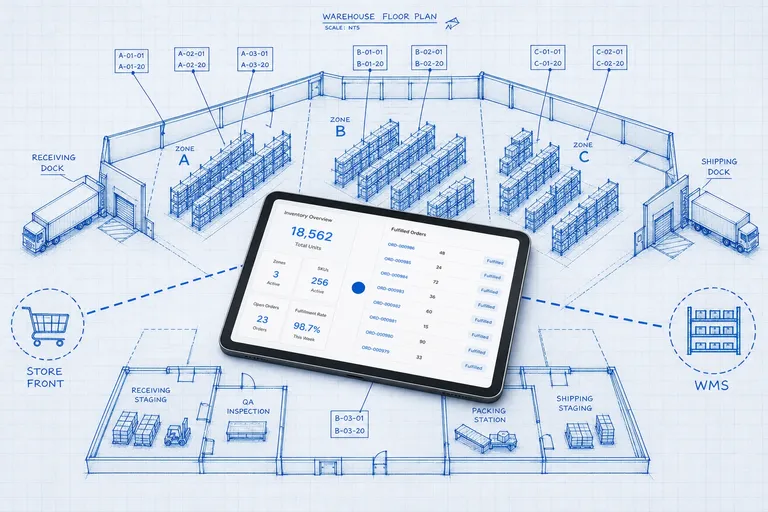
Start with the functional zones
Almost every warehouse, regardless of size, breaks into the same handful of zones. The job is to arrange them so product moves forward through the building rather than crossing back over itself.
- Receiving. Where inbound trucks unload. Needs dock space and room to stage and inspect before putaway.
- Storage. Usually split into reserve storage (bulk, less accessible) and forward pick (the active pick face where most picking happens).
- Picking. The zone where orders get assembled. Designed around minimizing travel.
- Packing. Where picked items get checked, packed, and labeled.
- Staging. A holding area for completed orders waiting on a carrier.
- Shipping. Outbound docks where orders leave.
When these are out of order — when a picker has to walk past shipping to reach the pick face, or stage orders back near receiving — every trip pays a tax.
Choose a flow pattern
The relationship between your receiving and shipping docks defines your overall flow. Three patterns cover most buildings.
Pattern | Shape | Best when |
|---|---|---|
I-flow (through-flow) | Straight line, receiving and shipping at opposite ends | Long, narrow buildings; high volume |
U-flow | Receiving and shipping on the same side | You want to share docks, staff, and equipment |
L-flow | Path turns 90 degrees | The building shape forces it, or to separate inbound and outbound |
I-flow keeps inbound and outbound completely separate, which is clean at high volume but eats a lot of floor length. U-flow is the most common for a reason: putting both dock functions on one side lets you flex labor and equipment between them and keeps your highest-velocity storage close to both. L-flow usually shows up when the footprint isn't a clean rectangle.
There's no universally correct pattern. Match it to your building shape and your throughput.
Put velocity to work in the storage zone
Once the big zones are placed, the storage layout is where you win or lose pick time. The principle is simple: the faster a SKU moves, the closer it belongs to packing and the easier it should be to reach.
This is where the golden zone matters. The golden zone is the shelf height between roughly knee and shoulder, where a worker grabs an item without bending down or reaching up. Put your A items there. Over thousands of daily picks, the seconds saved per pick add up to real hours.
Slow movers go higher, lower, and farther back. They get touched rarely, so the extra travel and reach cost little.
Three mistakes that quietly cost you
These don't announce themselves. They show up as overtime, rising error rates, and a vague sense that the team is always behind.
Slotting by arrival, not by velocity. The most common one. New stock lands wherever there's an open spot, so fast and slow movers end up scattered randomly. Pickers crisscross the building for a single order. The fix is deliberate, velocity-based slotting — and revisiting it as demand shifts.
Congestion in the pick face. Aisles too narrow, or all your A items clustered so tightly that pickers queue behind each other. Spread high-velocity SKUs enough that two pickers aren't fighting for the same three feet of aisle.
No room to grow at receiving. Teams design tight to maximize storage, then choke when volume rises and inbound has nowhere to stage. Leave receiving some breathing room. A backed-up dock stalls the whole building.
When to redesign
You don't rip up the floor every quarter. But a few signals say it's time to look hard at the layout:
- Pick travel time is climbing while volume is flat
- Your SKU mix has shifted a lot since the last design
- You've added a sales channel or fulfillment type the layout was never built for
- Congestion and near-misses are becoming routine
Layout is the foundation everything else sits on. Slotting, picking strategy, even your accuracy rate all get easier when goods flow cleanly and the busy SKUs are within reach. Get the zones and the flow right first, then tune from there.
Frequently asked questions
What are the main zones in a warehouse layout?
Six show up in most operations: receiving, storage (reserve and forward pick), picking, packing, staging, and shipping. The goal is to lay them out so product flows forward through the building instead of crossing back over itself.
What's the difference between U-flow, I-flow, and L-flow layouts?
They describe the path goods take. I-flow (or through-flow) runs receiving and shipping at opposite ends in a straight line. U-flow puts them on the same side so docks and staff are shared. L-flow turns the path 90 degrees, often to fit the building shape. Each suits a different footprint and throughput profile.
How much can layout actually improve throughput?
Travel can account for a large share of total pick time — by many estimates, close to half. Cutting unnecessary travel through better zoning and slotting improves throughput without adding headcount, which is why layout is usually the cheapest lever to pull first.
Plan the route. We deliver the rest.
See how Binlogic powers last-mile logistics — routing, tracking, and the platform that turns the plan into the package on the doorstep.
Book a callback